


 Maecenas at ipsum quis massa rutrum gravida! Ut in varius orci. Pellentesque habitant morbi tristique senectus et netus et malesuada fames ac turpis egestas.
 Phasellus sed lectus nec risus posuere rhoncus sed et ligula. Sed gravida ornare turpis vel euismod. Phasellus quis tortor non lacus sodales rutrum sit amet non est
 Donec elit nulla, pulvinar nec porta sed, hendrerit eget metus. Suspendisse porttitor ligula non felis volutpat pretium? Praesent laoreet nisl a eros ultricies in lacinia
Showing posts with label install. Show all posts
Showing posts with label install. Show all posts

L.A.M.P. is an acronym for solution stack of free and open source software. In order to create a viable general purpose web server, this term has been coined from the first letters of Linux (Operating System), Apache HTTP server, MySQL (database software) and Perl/Python/PHP. Generally "P" is taken to be as PHP but it may also refer to Perl or Python. PHP, Perl and Python are web scripting software.
Each package can be configured and installed separately. Here we will see how to install them at one shot. In earlier version of Ubuntu we used to have "tasksel" and "sudo tasksel" to bring various options including "lamp-server". Simply selecting lamp-server use to do the work. But we don't have tasksel in latest Ubuntu. No worries, we still can install the lamp stack in one shot.
Open your terminal. Either press "ctrl+alt+T" or from dash type "terminal" and press enter.
You will be prompted in terminal as shown in figure. Give a password for your MySQL "root" user (you can create more users too).

Now to check if its working or not just open your favorite browser and type "localhost" in the address bar. You should see something like this-
(note: this comes from the file index.html located in /var/www/ folder of your system.)

Now to check if php is working or if not, let us create a small php file

open your browser and type in address bar the following.

yay! you are done now! :-) cheers!
Oh wait. Let us also install phpmyadmin . phpmyadmin helps to take control over our database. It can be done graphically from the browser or from the command line.
to install
press space to select apache2 server and enter.

configure phpmyadmin with dbconfig-common. Press yes to configure. give your passwords.

When you are done type "localhost/phpmyadmin" in your address bar of browser, you should see something like this-
give user as "root" and password which you had given before.
you will be taken to phpmyadmin page.
on this page you can create databases, users and many more.
:)

Each package can be configured and installed separately. Here we will see how to install them at one shot. In earlier version of Ubuntu we used to have "tasksel" and "sudo tasksel" to bring various options including "lamp-server". Simply selecting lamp-server use to do the work. But we don't have tasksel in latest Ubuntu. No worries, we still can install the lamp stack in one shot.
Open your terminal. Either press "ctrl+alt+T" or from dash type "terminal" and press enter.
sudo apt-get install php5 mysql-server apache2The above command will install latest version of PHP which is version 5 and mysql-server with apache http server 2.
You will be prompted in terminal as shown in figure. Give a password for your MySQL "root" user (you can create more users too).

Now to check if its working or not just open your favorite browser and type "localhost" in the address bar. You should see something like this-
(note: this comes from the file index.html located in /var/www/ folder of your system.)

Now to check if php is working or if not, let us create a small php file
Open your terminal and type- sudo vi /var/www/info.phpor you can open the same from gedit or any other editor as
sudo gedit /var/www/info.php
and write:save the file and exit. Restart the apache2 service by typing the command in terminal
<?php
phpinfo();
?>
sudo service apache2 restart

open your browser and type in address bar the following.
localhost/info.phpand you should see something like this:

yay! you are done now! :-) cheers!
Oh wait. Let us also install phpmyadmin . phpmyadmin helps to take control over our database. It can be done graphically from the browser or from the command line.
to install
You will be prompted to screen like this-
sudo apt-get install phpmyadmin
press space to select apache2 server and enter.

configure phpmyadmin with dbconfig-common. Press yes to configure. give your passwords.

When you are done type "localhost/phpmyadmin" in your address bar of browser, you should see something like this-
give user as "root" and password which you had given before.
you will be taken to phpmyadmin page.
on this page you can create databases, users and many more.
:)

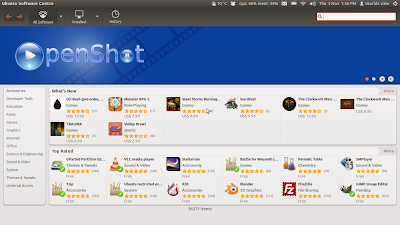
So, you have a shiny new Ubuntu installed and want to break out from the default applications. Don’t forget, installing applications in Ubuntu 11.10 is easy!
- Ubuntu Software Center
This is by far the easiest way to install programs in Ubuntu. Simply hit the dash key and type Ubuntu and the software center should pop up. Click on the orange bag icon and you will eventually hit the Software Center’s main screen. There are several ways you can find the applications you seek: you can either browse the categories on the far left, type in the search bar on the upper right quadrant of your screen, or simply browse the most popular apps or the newest releases. There are thousands of applications to choose from with most of them being free, but a few high quality paid apps too. One downside to using the software center is that many of these applications are maintained by the community as opposed to Canonical; therefore, it is not uncommon for these apps to be out of date. One example of this is Calibre. The Calibre community updates the ebook manager every week, but the app itself only gets updates once every year or so in the Ubuntu repositories.
- Command line
For the old school Linux users, this is familiar territory. The terminal and Synaptic uses the apt-get system which allows you to remove, add, or update applications easily and painlessly. All you need to install via terminal is administrator privileges and the name of the application you want. For instance, to install VLC, you will type;
Sudo apt-get install vlc
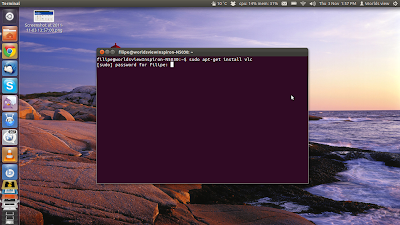
This command basically downloads the necessary packages and installs them onto your computer, allowing you to use VLC. Some other common and useful commands are:
Sudo apt-get remove vlc
To remove the application, in this case vlc,
Sudo apt-get update
This command can take a few minutes to run, but once it is finished you can then upgrade any packages with updates available.
Sudo apt-get upgrade
This will update any packages with updates pegged to them in the system
Sometimes you may need to install a .deb package from the command line, especially if you are trying to install applications in Ubuntu server installs. To install a deb file called example.deb, type:
Sudo dpkg –I example.deb
Similarly, you can remove deb packages with the following command
Sudo dpkg –r example.deb
- Installing a PPA
- It is not uncommon to have to install via ppa every now and then. Be sure to install ppas only from trusted sources, however, as you may leave your system open to people with malicious intent. To install a ppa:
- Open a terminal
- Open your browser and go to the application’s website you want to installSearch for a heading somewhere to the effect of installing or adding this ppa.Make a note of the ppa’s location. For example, gwibber can look like ppa:gwibber-daily/ppa
- Now, in the terminal type:
Sudo add-apt-repository ppa:gwibber-daily/ppa
- Once you hit enter your system will now fetch the ppa’s key.
- After you install any ppa, be sure to type the sudo apt-get update
- Enjoy your newly installed application!
- Using synaptic package manager (spm)

I personally try to avoid using synaptic package manager unless I absolutely have to partly because its interface is not the most informative unless you know absolutely what you are looking for. Ubuntu 11.10 no longer includes SPM by default so you will have to troll the software center to get it. Once you install it, launch it. SPM is basically a massive list with all the packages available for Debian and Debian derivatives like Ubuntu as well as all packages available to the repositories you’ve added. If you know
the name of the application or package you want, you can search for it in the search box, check the packages you want, mark for install, and then hit apply. If you do not know the name of the package you want, no worries, you can also search by typing a description. For instance, if you wanted to search for a new screensaver application, but don’t know the name of a particular one, you can search for “screensaver” and take a look at the packages available. You will see a variety of packages for gnome – screensaver, xscreensaver, etc.
Another feature here worth mentioning is the “Mark All Upgrades” button near the top of the application. This button, similar to sudo apt-get update, will search out all updates for packages you have installed and mark them all for installation. Hit apply.
- Deb packages
Sometimes, software developers will prefer not to have their applications available in the repositories and will want to distribute them themselves such as Opera, or any of Google’s software available to Linux. Installing these is allot like installing software on Windows since you have to go to the site and install the package. Let’s use Google Chrome as an example.
- Open your web browser (Ubuntu uses Firefox by default) and go to the google chrome home page
- Then download the .deb package.
- Once the package is downloaded, go to your Downloads folder
- Double click on the .deb package
- The Ubuntu Software Center will open
- Hit install
- Enjoy the program!
Sometimes, the software center will not open the application when you double click it even though it is a .deb package. Sometimes, you have to make the software center the default application for certain file types. To do so, right click on the package, go to properties, hit the Open With tab, then choose the software center as the default application to open with.

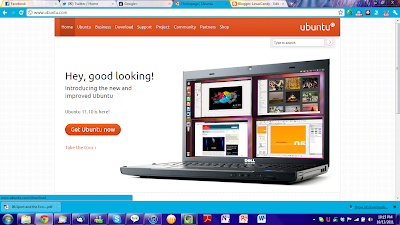
To get started, go to www.Ubuntu.com and download the ISO by clicking the Get Ubuntu Now. The website has a great graphic step - by - step on how to download the ISO.
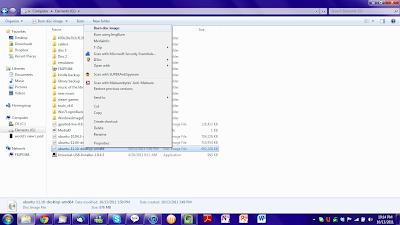
Pop in a CD or DVD into your computer's drive.
If you're using Windows 7, you just right click on the ISO once it's finished downloading and click "Burn disc image". Then choose the CD drive and hit start. Viola, you're done!
If you're using Windows Vista or XP, you will need to download a third - party disc burning software. I like Imgburn. You pretty much follow the same steps outlines above: right - click the ISO and then click "burn using Imgburn". Choose the disc drive and you are good to go!
If you're using Ubuntu 10.04 or above, the process is yet again similar. Open up StartUp Disc creator and select the downloaded ISO, choose the appropriate drive and select the ISO. Hit start and let the magic happen.
Enjoy!